DIY Shibori with Indigo
Plant-based dyes have been used for centuries by cultures all over the world and are still popular. They are better for the environment than synthetic dyes—which are usually petroleum based—and can produce a wide variety of rich and subtle colors. Working with natural dyes at home is rewarding and well worth learning how to do. This simple shibori project using indigo to dye dishcloths is a great introduction.
Shibori is the Japanese technique of creating patterns on fabric with a method called resist dyeing. The first step is to manipulate the fabric by folding, binding, twisting, stitching, or compressing it. The manipulations are kept in place using "resists"—rubber bands, clothespins, or other materials—applied or attached to the fabric so that the dye cannot be absorbed where they are located.
Historically, many natural dye sources were used for shibori, but indigo was the most commonly used dye and remains so today. We will be working with indigo extract derived the leaves of Indigofera tinctoria, a member of the bean family native to Asia and the most common source of indigo dye.
If you've got an outdoor space that can be used for dyeing, consider yourself lucky; if not, don't worry. You can make shibori at home even in a small city apartment.
It's crucial that you only dye natural fibers. Cotton, wool, hemp, and silk are all good options. For this project, I used kitchen towels of 100 percent cotton.
If your fabric is brand new, you will need to prewash it in hot water to remove any starch, oils, or other treatment; this will allow the fabric to absorb color more evenly.
The recipe we are using is called the 1-2-3 indigo vat, which refers to the three ingredients and the proportions needed. This method was made popular by Michel Garcia, a French botanist and dyer. His recipe is not only straightforward but also is the safest and cleanest recipe that I've worked with—no chemicals used. Win win!
Ingredients
- ½ cup natural indigo extract. This amount will result in a medium blue color. You can use less or a more if you desire a different shade.
- 1 cup pickling lime (found in specialty grocery stores and online)
- 1½ cup fructose powder
Supplies
- two-gallon bucket with airtight lid
- rubber gloves (Indigo will stain everything it lands on.)
- long plastic spoon
- jar or other small container with airtight lid
- scissors
- resists—rubber bands, acrylic shapes for crafting, dowels, or chopsticks, plus clamps to fasten them.
- broken-down cardboard box (to place under the bucket since it gets messy)
- vinegar (for disposal of leftover dye)
Prepare Your Fabric
Shibori Techniques
I love the look of a dip-dyed fabric, but sometimes I want patterns, and that's why I love shibori. You can use practically anything as a resist to create a pattern—rocks, pencils, clothespins, chopsticks, jar lids, etc. There are countless techniques to discover and create.
The list of things you can dye is endless too—socks, shirts, pillowcases, hats. (I think I've dyed every piece of white fabric in my apartment at this point!) There are so many ways to tweak the patterns and folds that every piece is unique.
Itajime
The itajime method for shibori creates patterns by using actual shapes where the dye never reaches. There are tons of different ways you can create amazing results with itajime. Below are three examples.
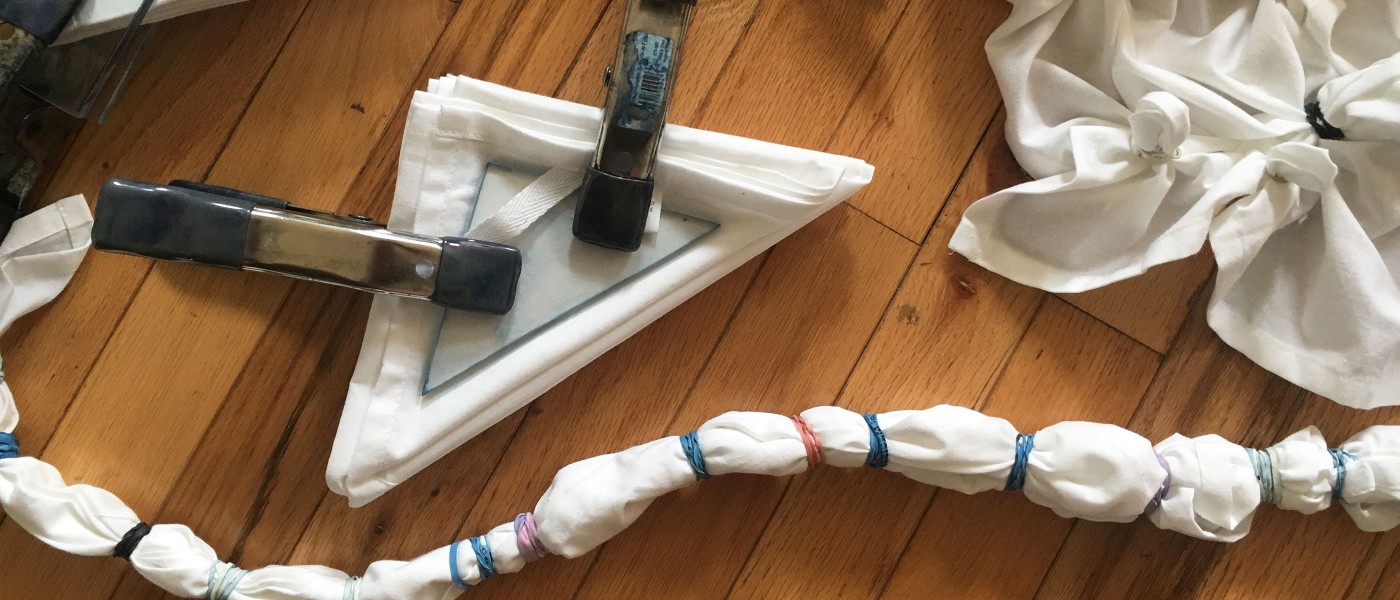
One: Start by laying your fabric out flat and then fold it accordion style lengthwise to create one long strip. Now start at one end and fold the fabric into triangles, also accordion style.
I find it easiest to fold one triangle, flip the fabric over and fold another triangle, repeating this until I've got a stack of triangles.
Take the acrylic crafting shapes and center them. Place one on either side of the fabric to make a sandwich. Use clamps to compress the fabric and hold the shapes in place.
Two: Follow the steps from the previous example until you've got an accordion stack of triangles. Take two dowels (chopsticks work too) and place them on either side of the fabric so that they intersect the triangle's center point but overhang the fabric by several inches. Use rubber bands and a clamp to secure everything firmly in place.
Three: If you want a wider strip than that formed by dowels, you can use the same method, but with wider resists.
Kanoko
The kanoko method is similar to tie dye in that the fabric is bound to create a pattern. This can be done with rubber bands, thread, etc.
Lay the fabric out flat, gather a small bunch of fabric and tighten it with a rubber band to create a circular pattern. Repeat. Simple and easy.
Kumo
Kumo is the technique of pleating and binding. Fold the fabric in half to create a triangle. Then fold the fabric inwards and outwards to create pleats accordion style on one side. Once that is complete, flip the fabric over and fold pleats on the other side.
Bind the fabric lengthwise by placing rubber bands as close or far apart as desired.
Prepare the Vat
Fill your airtight bucket with warm water from the faucet. Pour the indigo extract into a small jar and add warm water. Shake until dissolved. I've learned that adding some dice or buttons when you shake the jar will help the extract dissolve. Slowly pour the liquid from the jar into the bucket, being careful not to create bubbles or let the dice or buttons fall into the bucket. (You don't want oxygen in the bath. I will explain more later on.)
Stir in the pickling lime. This increases the pH in the water to between 9 and 11. I don't always test the pH because I know this recipe works with my tap water. If you want to be sure, you can find pH test strips at hardware stores or online.
Add the fructose to the mix. A quick chemistry lesson: Indigo is insoluble and does not naturally blend with water. The fructose aids in removing the oxygen from the indigo molecules, allowing them to attach to the fabric.
After you've added the fructose, stir carefully in one circular motion and put the lid on. Let sit for one hour. When the oxygen is removed (also termed reduced), the mixture can now be called an indigo vat.
After one hour, check on your vat. If it has a coppery sheen on top with a green-yellowish ring around it, your vat is ready! You should still do a test strip before dipping your first piece.
One thing to keep in mind throughout the entire process: Since oxygen is bad for the vat, avoid splashing, and keep the lid on whenever the vat is not in use.
Ready to Dip
Give the fabric a quick rinse in water, this allows the dye to absorb more evenly than if the fabric was dry. Carefully lower the fabric into the vat and let it soak for 5 to 10 minutes. Put your gloves on and gently massage the dye into the fabric's folds, but be careful not to move the resists or create bubbles.
After 5 to 10 minutes, carefully remove the fabric. Initially it will have a yellow-green hue but will quickly darken to blue as it is exposed to oxygen, just like magic.
Let the fabric oxidize for as long as it was in the dye vat. Make sure to expose all folds to oxygen while keeping the resists in place.
Indigo is unique in that the fabric darkens with repeated dipping and oxidizing. The more you dip, the darker it will be. Remember, the fabric will always appear darker when wet though!
Once you're happy with your shade of blue, carefully rinse the fabric until the water runs clear. Now you can take the resists off, unfold the fabric, and then rinse some more.
Generally, your fabric will dry two shades lighter than its wet tint. Wash out the excess dye in the washer by using a pH-neutral detergent such as Synthrapol. Hang it to air dry and enjoy your new creation!
If you have leftover indigo, it can be covered and used another day. If you'd like to dispose of it, first add one to two cups of vinegar to neutralize the vat and then simply pour it down the drain.